| Open the 2 font files and
minimize.
Open the cloud tube and minimize or export it
to your PSP tubes.
Copy the HSD gradient 1.psp to your gradients
file
Add the Brushed Gold preset files to your
Environment and Textures folder.
Open your image and minimize |
You do not need to install them.
As long as they are open, they are available to
use in PSP. |
| Create a New image 500 x 500 with
a transparent background.
|
|
Set your guide lines
to vertical- 250 Horizontal-250
|
To turn on your guides, click on
View>Rulers, then on View>
Guides. Then to place your guides,
place the cursor on the ruler, hold down the
left mouse button and drag the guide to your
image. |
| Set both your foreground color and background color
to black.
|
|
| Select the Text Tool then
choose the Calligraphy1 font and change the size
to 300. Set your stroke to 1.
|
For this (and some others) font,
the stroke makes the image for some
letters. If the stroke is not set to
a number you will see this:
|
| Click on
the canvas
|
|
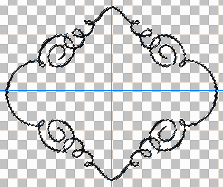
| Type the lowercase L and place
the top peak and bottom peak on guidelines. |
|
| Change the text size to 250.
Type the lowercase L and place it in about
the center with top peak and bottom peak on the
guidelines. This does not have to be precise.
|
|
| Deselect (ctrl D) |
|
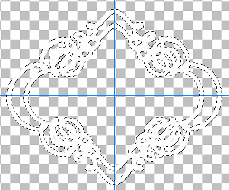
| Click on the Magic
Wand tool. Place the cursor anywhere on
the black outline of the image and click to
select it. |
This should select
all of the black lines. |
| Now click on
Selections> modify>expand-2 pixels.
(This places the selection 1 pixel on each
side of the outline.) |
|
Flood fill with white |
|
|
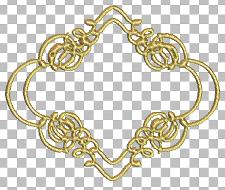
Note - I chose to do this
instead of just setting the stroke to 3 pixels,
because of the appearance of the gold after the
preset was applied. Try it either
way and see what you like.
|
|
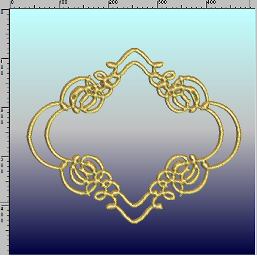
| Apply the SBP preset D_brushed
gold.
You should now have something similar to
this. |
|
| Save. |
If you desire, you can export this
to your picture frames. |
| On the layer palette, rename the layer to frame.
|
|
| Create a new
layer naming it sky.
Click on Layers>Arrange> send to
bottom.
|
|
| In the materials palette,
locate the HSD gradient1.
Being sure that the sky layer is highlighted,
Flood Fill the layer with the gradient |
|
| In the layers palette, highlight
the Frame layer. |
|
| Using the Magic Wand tool, click
somewhere outside the frame. |
|
| Click on
Selections> modify> expand> 1 pixel
|
This assures that the
sky doesn't "peek" out from under the
frame. |
| In the layers palette,
highlight the Sky layer, then press the delete
key. |
The sky should now be
only inside the frame. |
Deselect.
|
|
| Create a new layer, naming it
Clouds.
|
|
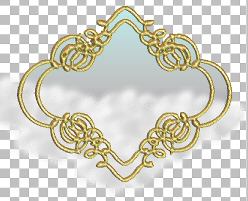
| Using the clouds tube, place
clouds all across the bottom of the frame. It should also extend beyond the frame and be visible. |
|
| Hiighlight the Frame layer.
|
|
| Using the Magic Wand tool, click
somewhere outside the frame. |
|
| Click on
Selections> modify> expand> 1 pixel |
This assures that the
clouds don't "peek" out from under the
frame. |
| Highlight the cloud layer and press the delete key. |
|
| deselect
|
|
| If you want to blur the clouds a
little more, click adjust>blur>blur |
|
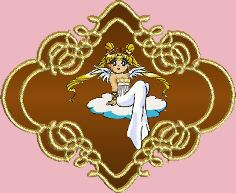
| Open the angel image and make any
size adjustments needed. |
|
| Click on Edit>Copy |
|
| Now right click on the top of the
frame image you are making. |
 |
| Click on Edit>Paste> As New
Layer |
The image will be pasted into the
center of the canvas. You can use the Mover tool to rearrange them if
you desire. |
| Using the Crop tool, crop to the
edges of the frame. |
|
| Resize if you desire. |
|
| Save as a PSP image. |
If you save this as a PSP image
you can re-use it with different components at a
later time. |
| TO ADD A NAME |
|
| Create a New Layer- Name it text
(or the name you will apply to the tag) |
|
| Click on the Text Tool |
|
| Select the Andrea Cursive ES font
or font of your choice. |
Select the font size.
I used 48 |
| Set the background color to the
color of your choice. I used #37457F |
|
| Place the name where you want it
on the picture. |
|
| If you need to, use the deformation tool to move
the text where you want it. (You will lose the selection when you do this.)
|
|
| Once the text is where you want
it, add a drop shadow if desired. |
|
Click Selections> select
all thenSelections>Float then
Selections> Defloat |
|
| The settings I used for the drop
shadow were:
Vertical and Horizontal - 2
Opacity 67
Blur 2
|
|
| Save as a psp file with your
layers intact. |
|
| Save again as a jpg file for use
as a sig tag. |
|